
Building model cars transforms a simple hobby into an art form that captivates enthusiasts worldwide. We’ve witnessed countless builders discover the incredible satisfaction of assembling intricate miniature vehicles from scratch, creating stunning replicas that showcase both patience and skill. Whether you’re drawn to classic muscle cars or modern supercars, model building offers an escape from digital screens and connects us with hands-on creativity.
The hobby has evolved dramatically from basic snap-together kits to sophisticated scale models requiring advanced techniques. We’ll explore how modern builders use everything from precision tools to custom paint jobs, creating museum-quality pieces that rival professional displays.
From selecting your first kit to mastering weathering techniques, model car building rewards dedication with tangible results. We’re here to guide you through this intriguing area where attention to detail meets pure enjoyment, helping you develop skills that’ll last a lifetime.
Getting Started With Model Cars Building: Essential Tools and Workspace Setup
Transforming plastic pieces into detailed automotive masterpieces requires the right equipment and environment. Setting up properly from the beginning makes your model car building journey smoother and more enjoyable.
Basic Hand Tools Every Builder Needs
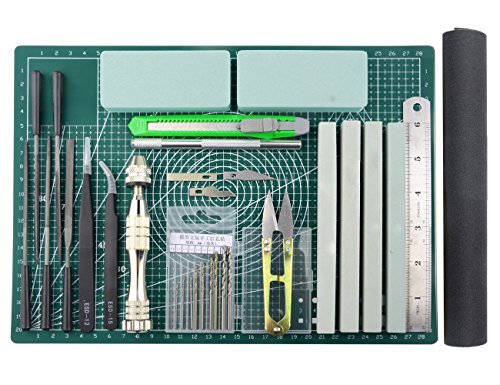
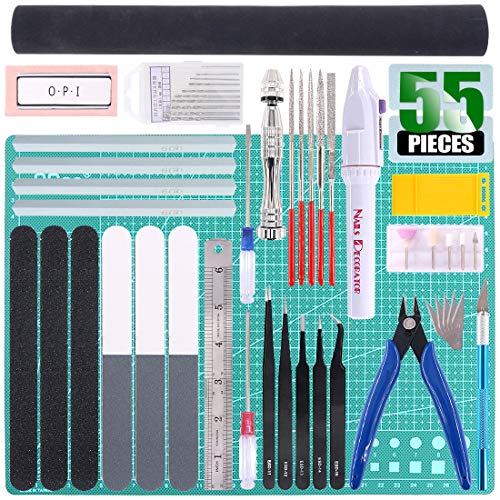
Plastic nippers top our list of must-have tools for cleanly cutting parts from sprues without damaging delicate details. We recommend investing in a quality pair like Tamiya Basic Tool Set nippers that provide precise cuts and reduce the need for extensive sanding.
Create knives handle detailed work like removing excess plastic, scribing panel lines, and creating custom modifications. X-Acto knives with replaceable blades work perfectly for most model car applications, and we suggest keeping several blade types on hand for different tasks.
Sanding supplies smooth rough edges and prepare surfaces for painting, with 400, 600, and 1000-grit sandpaper covering most needs. Sanding sticks and files help reach tight corners and curved surfaces that regular sandpaper can’t handle effectively.
Pin vises and drill bits create perfectly round holes for adding custom details like antennas, exhaust pipes, and roll cages. These hand-powered tools give you complete control over drilling speed and pressure, preventing cracks in delicate plastic parts.
Tweezers assist with placing tiny decals, positioning small parts, and handling photoetched details that fingers can’t grip properly. We prefer bent-tip tweezers for most model car work since they provide better visibility and access to tight spaces.
Creating the Perfect Workspace
Adequate lighting eliminates eye strain and helps you spot imperfections during assembly and painting phases. We recommend a combination of overhead lighting and an adjustable desk lamp with LED bulbs that provide consistent, bright illumination without generating heat.
Organized storage keeps your tools, paints, and parts easily accessible while preventing loss of small components. Tackle boxes with adjustable compartments work excellently for organizing different model car projects, and clear containers let you quickly identify contents.
Proper ventilation removes harmful fumes from glues, paints, and thinners that can affect your health during extended building sessions. A small exhaust fan near your work area or working near an open window provides sufficient airflow for most hobby applications.
Stable work surface prevents wobbling that can cause mistakes during detailed work like painting or decal application. A heavy desk or dedicated hobby table at comfortable height reduces fatigue and improves precision during long building sessions.
Cutting mat protects your work surface while providing measurement guides and a self-healing surface for knife work. We suggest a mat at least 12×18 inches to accommodate most model car parts and provide room for organizing components during assembly.
Safety Equipment and Precautions
Safety glasses protect your eyes from flying plastic pieces when cutting parts and prevent chemical splashes during painting operations. We recommend wraparound styles that provide side protection while maintaining clear vision of your work.
Nitrile gloves shield your hands from harsh chemicals in paints and adhesives while maintaining dexterity for detailed work. These disposable gloves resist punctures better than latex alternatives and don’t cause allergic reactions in sensitive individuals.
Dust masks filter out particles from sanding operations and spray painting that can irritate your respiratory system. N95-rated masks provide adequate protection for most model car building activities, and we suggest wearing them whenever creating airborne particles.
First aid supplies handle minor cuts and scrapes that occasionally occur when working with sharp tools and small parts. Keep adhesive bandages, antiseptic wipes, and tweezers for splinter removal within easy reach of your workspace.
Chemical storage prevents accidents by keeping solvents, paints, and adhesives in original containers away from heat sources and out of reach of children and pets. We recommend a dedicated storage cabinet with proper labeling to avoid confusion between different products.


Choosing Your First Model Cars Building Kit: A Beginner’s Guide

Selecting your first model car kit sets the foundation for your entire building journey. We’ll guide you through the essential factors that determine which kit will provide the most rewarding experience for new builders.
Understanding Scale Ratios and Their Importance
Scale ratios determine the size relationship between your finished model and the actual vehicle. Common scales range from 1:64 (smallest) to 1:12 (largest), with each offering distinct advantages for beginners.
1:24 and 1:25 scales provide the perfect balance of detail and manageable size for new builders. These models measure approximately 7-8 inches long, offering enough detail to practice essential techniques without overwhelming complexity. Parts remain large enough to handle comfortably while still requiring precision assembly skills.
1:32 scale models work exceptionally well for those with limited workspace or storage. These compact builds measure around 5-6 inches long and typically feature fewer parts than larger scales. Assembly time decreases significantly, allowing beginners to complete projects more quickly and build confidence.
1:18 scale kits offer impressive detail levels but require more advanced skills and patience. These 10-11 inch models contain many small parts and complex assemblies that can frustrate newcomers. We recommend avoiding this scale until you’ve mastered basic techniques on smaller projects.
Plastic vs Metal vs Resin Model Options
Material choice significantly impacts your building experience, cost, and final results. Each material type offers unique characteristics that suit different skill levels and preferences.
Plastic model kits dominate the beginner market due to their forgiving nature and affordable pricing. Styrene plastic cuts cleanly, sands easily, and accepts paint beautifully. Mistakes become correctable with plastic cement or super glue, and replacement parts often remain available from manufacturers.
Metal kits typically feature die-cast bodies with plastic detail parts, combining durability with easier assembly. These models require minimal painting since bodies come pre-finished in authentic colors. Assembly focuses primarily on adding wheels, interior pieces, and exterior details rather than complex construction.
Resin kits offer exceptional detail but demand advanced skills and specialized tools. These limited-production models require careful handling since resin can chip or crack easily. Dust masks become essential when sanding resin parts, and specialized adhesives ensure proper bonding.
Brand Recommendations for New Builders
Established manufacturers provide consistent quality and comprehensive instruction sheets that guide beginners through successful builds. These companies offer extensive product lines spanning multiple skill levels and price points.
| Brand | Scale Options | Skill Level | Price Range | Notable Features |
|---|---|---|---|---|
| Revell | 1:25, 1:24 | Beginner | $15-40 | Clear instructions, quality decals |
| AMT | 1:25 | Beginner-Intermediate | $20-45 | Authentic licensing, detailed engines |
| Tamiya | 1:24 | Intermediate | $25-60 | Premium quality, precision fit |
| Hasegawa | 1:24 | Intermediate-Advanced | $30-70 | Exceptional detail, photo-etch parts |
Revell kits excel as starter projects due to their straightforward assembly process and helpful instruction booklets. Color-coded part diagrams eliminate confusion, while pre-painted details reduce painting requirements for nervous beginners.
AMT models feature officially licensed designs with accurate proportions and authentic details. Their muscle car and truck selections appeal to enthusiasts seeking classic American vehicles. Part fit quality remains consistent across their product line.
Tamiya offerings represent premium quality with precise engineering and exceptional detail levels. Parts fit together seamlessly, reducing the need for extensive modification or filling. Their instruction sheets include helpful building tips and painting guides.


Mastering Basic Assembly Techniques in Model Cars Building

Building your first model car successfully depends on mastering fundamental assembly techniques that experienced builders use consistently. We’ll explore the essential methods that transform loose parts into stunning replicas.
Reading Instructions and Understanding Parts Layout
Studying instruction manuals thoroughly before touching any parts saves countless hours of frustration and prevents costly mistakes. We recommend examining the entire manual from cover to cover, paying special attention to the parts diagram that shows numbered components on plastic runners.
Identifying part numbers becomes crucial when working with complex kits containing 100+ pieces. Modern instruction booklets use clear numerical systems that correspond to raised numbers on each plastic part, making identification straightforward even for beginners.
Planning your assembly sequence helps avoid situations where you can’t access certain areas later. We suggest noting which parts need painting before assembly and which subassemblies should be completed separately before joining to the main body.
Understanding symbols and conventions in instruction manuals ensures you won’t miss critical steps. Most manufacturers use standardized icons for glue application points, paint colors, and optional parts that enhance the final appearance.
Proper Gluing and Bonding Methods
Choosing the right adhesive for each application determines the strength and appearance of your joints. We use plastic cement for permanent bonds between styrene parts, super glue for photoetched details, and white glue for clear parts that might need repositioning.
Applying glue sparingly prevents unsightly squeeze-out that ruins paint jobs and detail work. A single small drop on one surface creates sufficient bonding when parts are pressed together firmly for 10-15 seconds.
Creating strong joints requires proper surface preparation and alignment before glue application. We lightly sand glossy surfaces to improve adhesion and use alignment pins or temporary tape to ensure perfect positioning during the bonding process.
Allowing adequate cure time between assembly steps prevents weak joints that fail during handling. Plastic cement requires 30 minutes for initial set and 24 hours for full strength, while super glue bonds instantly but benefits from overnight curing.
Handling Small Parts and Detail Components
Using precision tools makes working with tiny components manageable and prevents damage from heavy-handed approaches. We rely on fine-pointed tweezers for placing small parts and magnifying glasses for examining intricate details during assembly.
Organizing small parts systematically prevents loss and confusion during lengthy build sessions. Divider boxes with multiple compartments keep related components together, while masking tape labels help identify parts removed from runners.
Managing photoetched details requires special techniques since these ultra-thin metal parts bend easily and demand careful handling. We use flat-nosed tweezers to hold these components and apply tiny amounts of super glue with toothpicks for precise placement.
Working in good lighting becomes essential when dealing with components smaller than rice grains. Adjustable LED desk lamps with daylight-balanced bulbs eliminate shadows and reveal fine details that standard room lighting often obscures.


Advanced Painting and Finishing Techniques for Model Cars Building

Professional painting techniques transform basic plastic models into stunning automotive replicas that capture the essence of real vehicles. We’ll explore the essential methods that elevate your model cars building projects from amateur to expert-level craftsmanship.
Primer Application and Surface Preparation
Clean surfaces ensure primer adhesion bonds properly with plastic components. Washing model parts with warm soapy water removes mold release agents and oils that can cause paint defects. Rinse thoroughly and allow complete drying before proceeding with surface preparation.
Sanding creates microscopic grooves that help primer grip the plastic surface. Use 600-grit sandpaper to lightly scuff glossy areas, working in circular motions to avoid visible scratches. Focus on large body panels like hoods, doors, and fenders where paint flaws become most noticeable.
Tack cloth removes dust particles that create bumps in the final finish. Wipe all surfaces immediately before primer application, paying special attention to panel lines and recessed areas where debris accumulates. Static electricity from plastic can attract airborne particles, so work in a dust-free environment.
Thin primer coats build up gradually for better coverage than single thick applications. Apply 2-3 light mist coats rather than one heavy layer, allowing 15-20 minutes between applications. Gray primer works best for dark colors, while white primer enhances bright finish colors like yellow or red.
Brush Painting vs Airbrushing Methods
Airbrushing delivers smooth, even coverage that mimics automotive paint finishes. This method excels for base coats, metallics, and large surface areas where brush marks would be visible. Maintain consistent 6-8 inch distance from the model surface and use steady, overlapping passes for uniform coverage.
Brush painting provides precise control for detail work and touch-ups. High-quality synthetic brushes work best with acrylic paints, while natural bristles suit enamel formulations. Thin paints to a milk-like consistency for smooth application without visible brush strokes.
Pressure control settings affect paint atomization and spray patterns. Set your airbrush compressor between 15-20 PSI for most applications, reducing to 10-12 PSI for fine detail work. Higher pressures can cause overspray and paint buildup in panel lines.
Multiple thin coats prevent runs and sags that ruin paint finishes. Whether using brushes or airbrushes, apply 3-4 light layers rather than attempting full coverage in one pass. Allow each coat to dry completely before adding the next layer.
Adding Realistic Weathering Effects
Dry brushing highlights raised details and creates worn paint effects. Load a stiff brush with small amounts of light-colored paint, removing excess on paper towels until only traces remain. Lightly drag the brush across raised surfaces like door handles, trim pieces, and panel edges.
Washes simulate dirt accumulation and enhance panel line definition. Mix dark acrylic paint with water or specialized wash answers, then flow the mixture into recessed areas using a small brush. Capillary action draws the wash into crevices naturally, creating realistic shadow effects.
Salt weathering technique produces authentic paint chip patterns. Spray base coat, sprinkle table salt on wet paint, then apply top coat after drying. Remove salt crystals to reveal underlying color, mimicking how real car paint chips away from metal surfaces.
Pastels create subtle dust and fade effects on model surfaces. Scrape chalk pastels with a create knife to create fine powder, then apply with soft brushes or cotton swabs. Seal weathering effects with matte clear coat to prevent smudging during handling.


Detail Enhancement Methods in Model Cars Building

Advanced detail enhancement transforms ordinary model builds into museum-quality masterpieces. We’ll explore precision techniques that professional builders use to create stunning automotive replicas.
Installing Custom Interiors and Engines
Custom interior installations elevate model cars from basic builds to showroom-quality displays. We start by carefully removing flash from interior components using fine-grit sandpaper and X-Acto knives to ensure precise fit.
Dashboard modifications require steady hands and attention to scale accuracy. We paint instrument clusters using tiny brushes with metallic silver for gauges and flat black for backgrounds. Adding clear coat over decals creates authentic glass-like surfaces that mimic real dashboard displays.
Seat detailing transforms plastic components into realistic upholstery. We use leather texture paints or fabric materials cut to scale for covering seats. Dry brushing with lighter colors highlights wear patterns and adds depth to the interior surfaces.
Engine bay enhancements showcase mechanical complexity through careful part separation and individual painting. We drill out exhaust manifolds and carburetor intakes using pin vises to create authentic hollow openings. Wire harnesses made from thin copper wire add realistic electrical details throughout the engine compartment.
Floor pan modifications include custom carpeting using flocked material or fine sandpaper painted in appropriate colors. We mask off pedal areas and transmission tunnels before applying base colors to maintain sharp detail lines.
Adding Photo-Etched Parts and Upgrades
Photo-etched components provide incredible detail enhancement that plastic parts cannot match. We handle these delicate metal pieces with tweezers to prevent fingerprints and bending damage during installation.
Preparation techniques involve cleaning photo-etched parts with alcohol to remove oils and ensuring strong adhesion. We score attachment points lightly with knife tips to create better bonding surfaces for super glue application.
Installation methods require patience and precision tools for successful results. We use small amounts of thin CA glue applied with toothpicks to avoid excess adhesive that can damage surrounding details. Positioning parts with fine tweezers allows for micro-adjustments before the glue sets completely.
Common upgrades include radiator grilles, license plates, door handles, and trim pieces that add authentic scale detail. We paint these components before installation using appropriate metallic or body-matched colors. Chrome pieces receive polishing compound applications to achieve mirror-like finishes.
Folding techniques for complex photo-etched parts require gentle pressure and proper tools. We use smooth-jaw pliers or specialized photo-etch bending tools to create clean angles without cracking the metal. Test fitting ensures proper alignment before final glue application.
Creating Realistic Tire and Wheel Details
Tire and wheel finishing separates amateur builds from professional-quality models through attention to automotive authenticity. We begin by removing parting lines from tire sidewalls using fine sandpaper and sanding sticks.
Tire enhancement involves creating realistic rubber textures and wear patterns. We apply flat black base coats followed by dry brushing with dark gray to highlight tread patterns and sidewall details. Weathering powders mixed with clear coat create authentic road dust accumulation.
Wheel detailing requires multiple paint applications to achieve realistic metallic finishes. We mask off tire areas and apply chrome or metallic base coats to wheel faces. Pin striping with fine brushes adds racing stripes or manufacturer decals for authentic appearance.
Brake system details include painting brake calipers in bright colors and adding brake disc textures. We use metallic silver for rotor surfaces and drill small holes to simulate ventilated disc designs. Red or yellow caliper paints create sporty appearances that match real vehicle specifications.
Mounting techniques ensure proper wheel alignment and realistic stance. We check for proper fit before gluing and adjust suspension components if necessary. Adding weight to wheel wells prevents top-heavy models from tipping during display or handling.


Troubleshooting Common Model Cars Building Problems

Even experienced builders encounter challenges during model car assembly. We’ll help you overcome the most frequent issues that can derail your project.
Fixing Alignment Issues and Poor Fits
Test fitting remains our most effective prevention strategy for alignment problems in model car construction. We always dry-fit parts multiple times before applying any adhesive to identify potential issues early.
Sanding contact surfaces solves most stubborn fit problems we encounter during assembly. Start with 320-grit sandpaper to remove excess plastic from mating surfaces, then progress to 600-grit for smooth finishes. Focus on high spots and flash marks that prevent proper seating.
Heating plastic parts makes them more flexible for improved alignment on difficult connections. Use warm water (not boiling) or a hair dryer on low heat to soften plastic components before positioning them correctly.
Strategic shimming corrects gaps between body panels and chassis components. Cut thin strips of plastic card stock or use automotive body filler for larger spaces. Sand these additions flush with surrounding surfaces once cured.
Pin vises create perfect alignment holes when parts need additional support during curing. Drill matching holes in both pieces and insert thin wire or plastic rod to maintain proper positioning while adhesive sets.
Removing Paint Mistakes and Starting Over
Isopropyl alcohol removes fresh acrylic paint before it fully cures on most plastic surfaces. Soak a cotton swab with 91% isopropyl alcohol and gently scrub the affected area within 30 minutes of application.
Paint strippers handle stubborn enamel finishes that won’t respond to alcohol treatment. Use automotive paint stripper or brake fluid (which won’t damage plastic) applied with cotton swabs for precise removal.
Masking tape protects surrounding areas during paint removal operations. Apply high-quality automotive masking tape around the mistake zone to prevent damage to correctly painted sections.
Light sanding smooths surfaces after chemical paint removal to prepare for refinishing. Use 1000-grit wet sandpaper with light pressure to avoid creating scratches that show through new paint layers.
Multiple thin primer coats ensure proper adhesion when repainting stripped areas. Apply 2-3 light mist coats rather than one heavy application to achieve professional results without obscuring surface details.
Dealing with Missing or Broken Parts
Inventory checking prevents discovery disasters during critical assembly phases. We count all parts against the instruction sheet before starting any project to identify missing components early.
Spare parts boxes provide immediate answers for common breakage scenarios. Collect wheels, mirrors, antennas, and small details from previous builds to create your own replacement inventory.
3D printing replaces complex missing parts when manufacturer replacements aren’t available. Many online communities share STL files for popular model car components that match original specifications.
Scratch building techniques recreate simple components using basic materials like plastic rod, sheet stock, and wire. Reference photos from real vehicles help ensure accurate proportions and mounting points.
Manufacturer customer service offers replacement parts for recent kit releases when contacted with proof of purchase. Most major brands maintain parts inventory for 2-3 years after initial kit release dates.
Model car forums connect builders with others who have spare parts from identical kits. Post clear photos of needed components along with kit number and scale for fastest response from community members.
Building Different Types of Model Cars: Specialized Techniques

Different model car categories require unique approaches and specialized techniques to achieve authentic results. We’ll explore the distinct methods needed for classic cars, sports cars, and military vehicles to help you master each genre.
Classic Car Models and Vintage Details
Classic car models demand attention to period-accurate details that capture automotive history from the 1920s through 1970s. We focus on chrome detailing using Molotow liquid chrome markers or bare metal foil to replicate the lustrous bumpers, trim pieces, and wire wheels that defined vintage automobiles.
Authentic aging techniques transform new plastic into weathered metal surfaces that tell stories of decades past. We apply thin washes of burnt umber and raw sienna acrylic paints to simulate natural patina on chrome bumpers, door handles, and exhaust pipes. Light dry brushing with silver paint creates realistic wear patterns on high-touch areas like running boards and door sills.
Interior fabrics require special consideration for classic car authenticity. We use flocking powder in appropriate colors to simulate velour upholstery common in 1960s luxury cars, or apply thin layers of leather texture paint for sports car interiors. Dashboard details benefit from careful hand painting using period-correct color schemes like turquoise, red, or black with white gauges.
Engine bay accuracy separates amateur builds from professional replicas. We detail carburetors, distributors, and air cleaners with metallic paints and careful wash applications to highlight mechanical complexity. Wire spark plug leads made from thin copper wire add realistic detail that factory kits often omit.
Sports Car Models and Performance Features
Sports car models showcase cutting-edge automotive technology through detailed engine components and aerodynamic elements. We emphasize performance modifications that distinguish these vehicles from standard passenger cars, starting with detailed brake systems featuring cross-drilled rotors and multi-piston calipers.
Carbon fiber texturing requires specialized techniques to achieve realistic appearance. We create authentic carbon weave patterns using decal sheets or hand-painting thin crosshatch lines with dark gray over black base coats. Clear coating preserves the pattern while adding depth that mimics real carbon fiber components.
Suspension components deserve extra attention in sports car builds. We detail coilover shocks, sway bars, and control arms using metallic paints and careful weathering to show mechanical wear. Lowered stance modifications require careful measurement and sometimes trimming suspension components to achieve proper ride height.
Tire details make important impact on sports car authenticity. We use fine brushes to paint sidewall lettering and apply subtle dry brushing to simulate tire wear patterns. Performance tires often feature directional tread patterns that require careful alignment during assembly.
Engine bay modifications showcase performance enhancements common in sports cars. We detail turbochargers, intercoolers, and performance air intakes using metallic paints and careful highlighting to emphasize mechanical complexity. Custom exhaust headers and performance manifolds require precise painting to achieve realistic heat discoloration effects.
Military Vehicle Models and Combat Wear
Military vehicle models require specialized weathering techniques that simulate battlefield conditions and environmental exposure. We apply heavy mud effects using texture paste mixed with earth-tone acrylics to create realistic dirt accumulation around wheel wells, track assemblies, and lower hull areas.
Armor damage effects add authenticity to combat vehicles through careful application of battle wear. We create bullet impacts using heated pins to make small dents, then apply dark wash around impact points to simulate metal deformation. Larger damage requires careful cutting and filing to create realistic battle scars.
Camouflage patterns demand precision and historical accuracy for different theaters of operation. We use masking techniques with torn tape edges to create soft-edged camouflage boundaries, then apply appropriate color schemes for exact time periods and geographic regions. Desert, woodland, and winter patterns each require different approaches and color selections.
Track weathering presents unique challenges in military model building. We apply rust effects using orange and brown washes, focusing on pin connections and guide teeth where metal-on-metal wear occurs. Rubber pads on tracks benefit from dry brushing with light gray to simulate wear patterns from road contact.
Equipment and accessories require careful attention to scale and authenticity. We detail personal gear, weapons, and communication equipment using appropriate military colors and weathering effects. Antenna arrays, external fuel tanks, and spare parts stowage add realism when properly scaled and positioned according to historical references.


Displaying and Protecting Your Model Cars Building Projects

After investing countless hours perfecting your model car builds, we need to showcase and protect these miniature masterpieces properly. Professional presentation and preservation ensure our detailed work remains pristine for years to come.
Creating Professional Display Cases
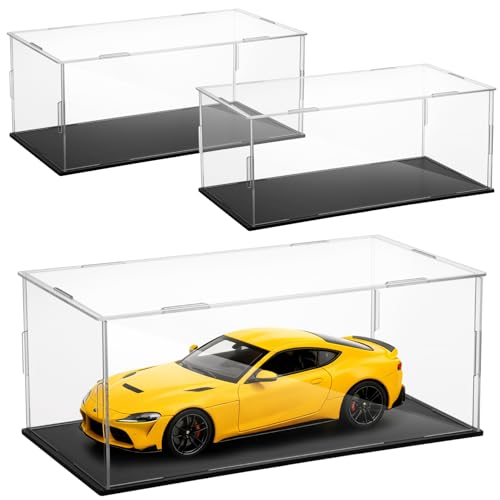
Acrylic display cases provide the ultimate protection while maintaining full visibility of our model car building achievements. We recommend selecting cases with UV-resistant properties to prevent paint fading and deterioration over time. Clear acrylic construction offers 360-degree viewing angles that highlight every detail we’ve meticulously crafted.
Dust-free environments become essential for maintaining the pristine condition of our finished models. Professional cases feature sealed designs that eliminate airborne particles from settling on detailed surfaces. We should choose cases with removable tops or hinged lids for easy access during cleaning or adjustments.
LED lighting systems transform ordinary displays into museum-quality presentations of our model car projects. Strategic placement of LED strips illuminates key features like engine details, interior work, and custom paint finishes. We can install battery-operated or plug-in systems depending on our display location requirements.
Scale-appropriate sizing ensures each model receives adequate space for optimal presentation. Standard display cases accommodate popular scales like 1:24 and 1:25 perfectly, while larger models may require custom answers. We should measure our completed builds before purchasing cases to guarantee proper fit and visual impact.
Base materials enhance the professional appearance of our model car displays significantly. Options include mirrored surfaces that create stunning reflection effects, textured bases that simulate realistic environments, or simple black felt that provides elegant contrast. We can customize bases with nameplates, specification details, or build information plaques.
Photography Tips for Showcasing Your Work
Natural lighting produces the most accurate colors and reveals fine details in our model car photography. We should position our models near large windows during overcast conditions for even, diffused illumination. Direct sunlight creates harsh shadows and hotspots that obscure the craftsmanship we’ve achieved.
Camera angles dramatically impact how viewers perceive our model car building skills and attention to detail. Low-angle shots emphasize the aggressive stance of sports cars, while three-quarter front views showcase both exterior details and interior work. We can experiment with multiple perspectives to capture every aspect of our builds effectively.
Background selection keeps focus on our models without creating distracting elements in photographs. Seamless paper rolls in neutral colors like white, gray, or black provide clean, professional backdrops. We should avoid busy patterns or competing colors that draw attention away from our detailed work.
Macro photography reveals the incredible precision and craftsmanship present in our model car projects. Close-up shots of engine bays, interior details, and weathering effects demonstrate our advanced techniques to fellow enthusiasts. We need macro lenses or close-focusing capabilities to achieve sharp, detailed images of small components.
Lighting equipment gives us complete control over illumination and shadow placement in our model photography. Softbox lights eliminate harsh shadows while providing even coverage across all surfaces. We can use reflectors to fill shadow areas and highlight exact details we want to emphasize in our shots.
Storage Answers for Long-Term Preservation
Climate-controlled environments prevent damage from temperature fluctuations and humidity changes that affect our model car materials. We should maintain consistent temperatures between 65-75°F with relative humidity levels around 45-55% for optimal preservation. Extreme conditions cause plastic parts to warp and metal components to corrode over time.
Individual protective containers shield each model from dust, handling damage, and accidental impacts during storage periods. Clear plastic storage boxes with secure lids allow visual identification while providing complete protection. We can add foam padding or custom-cut inserts to prevent movement and potential damage.
Inventory organization systems help us locate exact models quickly while maintaining detailed records of our collection. Digital catalogs with photographs, build dates, and modification notes create comprehensive documentation. We should include storage location information and condition assessments for each model in our database.
Pest prevention measures protect our model car investments from insects and rodents that can cause important damage. Regular inspection of storage areas identifies potential problems before they affect our collection. We can use moisture absorbers, cedar blocks, or other natural deterrents to maintain pest-free environments.
Security considerations safeguard valuable model car collections from theft or unauthorized handling by family members or visitors. Locked storage cabinets or dedicated display rooms provide controlled access to our prized builds. We should consider insurance documentation and photographic records for high-value models in our collection.


Advanced Model Cars Building: Custom Modifications and Scratch Building

Advanced model car builders transform ordinary kits into unique masterpieces through custom modifications and scratch building techniques. These sophisticated methods require patience, skill, and creativity to achieve truly exceptional results.
Kitbashing and Parts Swapping Techniques
Kitbashing combines parts from multiple kits to create unique custom vehicles that don’t exist in the real industry. We’ve found that successful kitbashing requires careful planning and precise measurements to ensure proper fit between components from different manufacturers. Popular combinations include swapping engine components between different car models or transferring wheels and suspension parts to create custom hot rods.
Parts swapping works best when components share similar scales and mounting points. Revell and AMT kits often use compatible attachment methods, making them ideal candidates for part exchanges. We recommend dry fitting all components before committing to permanent modifications, as some alterations may require filling gaps or reshaping mounting surfaces.
Professional kitbashers maintain extensive parts inventories from various manufacturers to expand their customization options. Common swaps include engine transplants, interior modifications, and wheel changes that dramatically alter a model’s appearance. Advanced builders create hybrid vehicles by combining front and rear sections from different kits, requiring precise cutting and rejoining techniques.
Successful kitbashing demands understanding of automotive proportions to maintain realistic appearances. We use automotive references and photographs to guide our modifications, ensuring that custom combinations look believable. Tools like rotary cutters and files help reshape plastic components for better integration between different kit parts.
Creating Custom Decals and Graphics
Custom decals transform ordinary model cars into personalized automotive replicas with unique graphics and sponsor liveries. We create professional quality decals using clear decal paper and laser printers, which produce sharp text and graphics that rival commercial products. Inkjet printers work well for color decals when paired with appropriate waterproof decal paper.
Design software like Adobe Illustrator or free alternatives such as GIMP enable precise graphic creation at correct scales. We measure model surfaces carefully before designing decals to ensure proper sizing and placement. Reference photographs help recreate authentic racing liveries or create believable fictional sponsor graphics.
Application techniques for custom decals mirror those used with commercial products, requiring clean surfaces and proper moisture levels. We use decal setting solution to help custom graphics conform to curved surfaces and eliminate air bubbles. Clear coat application protects custom decals from handling damage and provides a uniform finish.
Digital printing allows for unlimited customization options including personalized license plates, racing numbers, and sponsor logos. We’ve successfully created period correct decals for classic car models by researching historical graphics and recreating them digitally. Multiple decal sheets enable experimentation with different graphics configurations before final application.
Scratch Building Components from Raw Materials
Scratch building creates components that don’t exist in commercial kits using raw materials like plastic sheet, rod, and tubing. We construct custom parts using styrene plastic in various thicknesses, which can be cut, shaped, and joined with standard plastic cement. Common scratch built components include roll cages, exhaust systems, and interior modifications that enhance realism.
Evergreen Scale Models provides comprehensive ranges of styrene shapes including strips, tubes, and structural sections perfect for automotive applications. We use these materials to create custom chassis modifications, suspension components, and engine details that aren’t available in standard kits. Proper measurement and planning ensure that scratch built parts integrate seamlessly with existing kit components.
Advanced scratch building techniques include creating complex curves using heat formed plastic and constructing detailed mechanical components from multiple pieces. We employ templates and jigs to ensure consistency when building multiple identical parts. Photo etched brass sheets provide additional material options for creating ultra fine details like grilles and trim pieces.
Professional scratch builders maintain comprehensive tool collections including scribing tools, circle cutters, and specialized shaping implements. We recommend starting with simple rectangular parts before attempting complex curved components. Reference materials and dimensional drawings guide accurate reproduction of real automotive components in miniature scale.


Joining the Model Cars Building Community and Continuing Education

Building connections within the model car community accelerates your learning journey and provides ongoing inspiration. We’ll explore how connecting with fellow enthusiasts enhances your skills and keeps you motivated.
Finding Local Clubs and Online Forums
Local hobby shops serve as excellent starting points for discovering model car clubs in your area. Many shops maintain bulletin boards with club meeting announcements and contact information for regional groups. We recommend checking with stores that carry extensive model car inventories, as they often host club meetings or sponsor building events.
Library community centers frequently offer meeting spaces for model car clubs and maker groups. These venues provide neutral ground for enthusiasts to gather, share techniques, and display completed projects. Visiting during evening hours increases your chances of finding active club meetings in progress.
Online forums create global connections with builders sharing diverse expertise and perspectives. Scale Auto Magazine’s forum attracts serious builders discussing advanced techniques and product reviews. Reddit’s r/ModelCars community offers beginner-friendly advice with active daily discussions and progress sharing.
Model Car Industry forum specializes in comprehensive build logs and technique tutorials from experienced modelers. Members frequently post detailed photo sequences showing complex modification processes. Fine Scale Modeler’s online community extends beyond cars to include all modeling disciplines, providing cross-pollination of ideas and techniques.
Facebook groups offer real-time interaction through dedicated model car building communities. Search for groups like “Scale Model Car Builders” or “1:25 Scale Model Cars” to find active communities matching your interests. These platforms help quick problem-solving and parts sourcing assistance.
Participating in Competitions and Shows
Regional model contests provide structured environments for showcasing your craftsmanship while learning from judging feedback. International Plastic Modelers’ Society (IPMS) chapters organize competitions across skill levels with detailed scoring criteria and constructive critique sessions. Entry categories typically include stock builds, modified vehicles, and open-class custom creations.
Local car shows often feature model car displays alongside full-size vehicles, creating unique exhibition opportunities. Classic car events particularly welcome period-accurate model reproductions that complement the main attractions. We suggest contacting show organizers about display requirements and setup procedures well in advance.
Hobby shop competitions offer low-pressure introduction to competitive model building with supportive local audiences. These events frequently include multiple skill categories and age divisions, making them accessible for beginners seeking first competition experience. Prizes often include store credit and modeling supplies rather than trophies.
Online competitions through social media platforms eliminate geographic barriers while maintaining competitive excitement. Model Car Mayhem hosts monthly themed contests with voting by community members. Instagram hashtag challenges create informal competitions around exact themes like “barn finds” or “race cars.”
Contest judging teaches valuable evaluation criteria including fit and finish quality, paint application, detail accuracy, and creative modifications. Observing judging sessions reveals professional standards and common mistake patterns. Taking notes during critique sessions helps identify areas for improvement in future projects.
Learning from YouTube Channels and Tutorials
Scale Model Database channel offers comprehensive technique demonstrations with clear close-up camera work and detailed explanations. Host Brian demonstrates everything from basic assembly to advanced weathering using common tools and affordable supplies. Episode series cover complete builds from unboxing through final photography.
Night Shift Scale Models provides expert-level tutorials focusing on realistic weathering and damage simulation. The channel’s strength lies in explaining the reasoning behind technique choices rather than just showing procedures. Episodes include detailed parts lists and supplier recommendations for specialized materials.
Plasmo channel delivers professional-quality content with exceptional production values and advanced modeling techniques. Complex builds are broken into manageable segments with clear progress markers and helpful tips sections. The presenter’s calm teaching style makes difficult concepts accessible to intermediate builders.
Scale Model Medic specializes in problem-solving tutorials addressing common building challenges and mistake corrections. Episodes cover topics like paint removal, part alignment fixes, and creative answers for missing components. This channel proves particularly valuable when encountering unexpected build complications.
Model Car Garage combines entertainment with education through conversational build-along formats. Multiple projects run simultaneously, allowing viewers to choose episodes matching their current interests. The host’s honest discussions about failures and answers provide realistic expectations for building experiences.
Tutorial playlists organize learning paths for exact skills like airbrushing, photo-etching, or engine detailing. Creating personal watchlists helps track your educational progress and provides easy reference during builds. Many channels offer downloadable resources including parts lists, paint charts, and technique reference sheets.
Conclusion
Model car building offers us an incredibly rewarding journey that combines technical skill with artistic expression. Whether we’re drawn to classic automobiles or modern supercars each project teaches us valuable lessons in patience precision and craftsmanship.
The hobby continues to evolve with new techniques materials and community resources becoming available regularly. We’ve discovered that success comes from starting with quality tools mastering fundamental techniques and gradually advancing to more complex projects.
Most importantly we’ve learned that joining the vibrant model car community enhances our experience tremendously. Through shared knowledge competitions and mutual support we can continue growing our skills while preserving this timeless create for future generations of enthusiasts.
Frequently Asked Questions
What tools do I need to start building model cars?
Essential tools include plastic nippers for cutting parts, X-Acto knives for precision cutting, various grits of sandpaper, pin vises with drill bits, and fine-tip tweezers. You’ll also need plastic cement or super glue, a cutting mat, and basic paintbrushes. Safety equipment like glasses and gloves are recommended for protection during assembly.
Which scale is best for beginner model car builders?
The 1:24 and 1:25 scales are ideal for beginners because they offer an excellent balance of detail and manageability. These scales are large enough to show intricate details but not so complex that they overwhelm new builders. They also have the widest selection of kits available from various manufacturers.
What’s the difference between plastic, metal, and resin model kits?
Plastic kits are most common and beginner-friendly, offering good detail at affordable prices. Metal kits provide superior durability and weight but are more expensive and challenging to work with. Resin kits offer the finest detail but require special handling, advanced skills, and proper ventilation due to toxic dust when sanded.
How do I prevent alignment problems during assembly?
Always test-fit parts before applying glue, and read the instruction manual thoroughly before starting. Use sanding techniques to improve part fit, and consider strategic shimming with thin plastic strips to fill gaps. Take your time with each step and ensure proper surface preparation for the strongest joints.
What advanced techniques can make my model car look more realistic?
Weathering effects like dry brushing, washes, and realistic aging can dramatically enhance authenticity. Custom interior detailing, engine bay enhancements, and photo-etched parts add incredible detail. Proper tire and wheel detailing, along with professional paint techniques using primers and multiple thin coats, create museum-quality results.
How should I display and protect my completed model cars?
Use UV-resistant acrylic display cases to protect from fading and dust accumulation. Maintain stable temperature and humidity levels, and avoid direct sunlight exposure. For photography, use optimal lighting setups and consider multiple camera angles to showcase your craftsmanship. Store valuable collections in climate-controlled environments with security measures.
Where can I find help and inspiration for model car building?
Join local model car clubs and online forums to connect with fellow enthusiasts and share techniques. Participate in competitions and shows to showcase your work and learn from others. YouTube channels and tutorial websites offer excellent resources for learning advanced techniques and troubleshooting common problems.