
Getting the wrong wheels for your vehicle can turn an exciting upgrade into a costly nightmare. We’ve all been there – falling in love with a perfect set of rims only to discover they won’t fit our car’s wheel hubs. The culprit? An incorrect wheel stud pattern measurement.
Your wheel stud pattern (also called bolt pattern or lug pattern) determines which wheels will properly mount to your vehicle. This critical measurement ensures your wheels sit flush against the hub and distribute weight evenly for safe driving. Without knowing your exact stud pattern you’re essentially shopping blind.
The good news? Measuring your wheel stud pattern isn’t rocket science. With the right tools and our step-by-step guide you’ll master this essential skill in minutes. We’ll show you proven techniques that work for both 4-lug and 5-lug patterns plus insider tips that’ll save you time and prevent costly mistakes.
What Is a Wheel Stud Pattern and Why It Matters
Wheel stud pattern defines the arrangement of bolts or studs that secure your wheel to the vehicle’s hub. We measure this pattern by counting the number of bolts and determining the distance between them, typically expressed as two numbers like 5×114.3 or 4×100.
The first number indicates bolt count while the second represents the diameter of the circle formed by the bolt centers, measured in millimeters. Manufacturers design each vehicle with exact stud patterns to ensure proper weight distribution and structural integrity.
Common stud patterns include:
- 4×100 (found on compact cars like Honda Civic)
- 5×114.3 (standard for many sedans and SUVs)
- 6×139.7 (typical for heavy-duty trucks)
- 8×170 (used on large commercial vehicles)
Proper wheel stud pattern matching prevents catastrophic wheel failure during operation. Installing wheels with incorrect patterns creates uneven stress distribution across mounting points, leading to bolt loosening, wheel wobble, and potential detachment while driving.
Aftermarket wheel compatibility depends entirely on matching your vehicle’s original stud pattern specifications. Performance modifications and custom wheel installations require precise measurements to maintain safe operation and avoid expensive fitting mistakes.
| Bolt Count | Measurement Method | Common Applications |
|---|---|---|
| 4 bolts | Center to center distance | Compact cars, economy vehicles |
| 5 bolts | Diameter of bolt circle | Sedans, crossovers, light trucks |
| 6+ bolts | Professional measurement tools | Heavy trucks, commercial vehicles |
Vehicle manufacturers engineer stud patterns based on weight capacity, torque requirements, and safety standards exact to each model year and trim level.


Tools You’ll Need to Measure Wheel Stud Pattern

Measuring your wheel stud pattern accurately requires exact tools that range from basic household items to specialized automotive equipment. We recommend starting with simple measuring tools before investing in more precise instruments.
Basic Measuring Tools
- Tape measure or ruler provides sufficient accuracy for most wheel stud pattern measurements, particularly 4, 6, and 8-lug configurations where you measure directly across opposing bolt holes
- Standard ruler works effectively for smaller bolt circle diameters under 6 inches
- Flexible measuring tape accommodates larger wheel hubs and curved surfaces more easily than rigid rulers
Precision Measuring Equipment
- Calipers deliver the most accurate measurements for critical applications like performance wheels or custom modifications
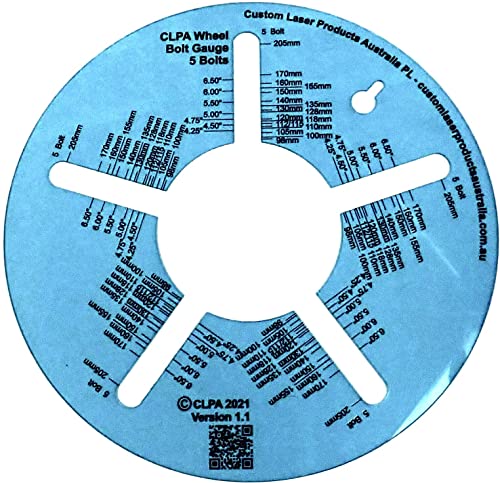
- Bolt pattern gauge eliminates guesswork entirely by providing pre-marked templates for common stud patterns
- Digital calipers offer readings precise to 0.1mm, which proves essential for European vehicles with metric specifications
Documentation Tools
- Pencil and paper allows you to record multiple measurements and cross-reference results
- Phone camera captures clear images of your measurements for later verification
- Measurement conversion app helps translate between metric and imperial units when needed
| Tool Type | Best For | Accuracy Level |
|---|---|---|
| Tape measure | 4, 6, 8-lug patterns | ±1-2mm |
| Calipers | 5-lug patterns | ±0.1mm |
| Bolt pattern gauge | All patterns | Exact match |
Most wheel stud pattern measurements require only a tape measure and careful technique. Professional mechanics prefer calipers for 5-lug patterns because measuring center-to-center across non-opposing holes demands greater precision than standard measuring tools provide.


How to Identify the Number of Wheel Studs

We begin our measurement process by determining the total number of lug holes present on our wheel. Counting the lug holes accurately forms the foundation for calculating the correct stud pattern measurement.
Most vehicles feature wheels with 4, 5, 6, or 8 lug holes as standard configurations. Compact cars typically use 4-lug patterns, while sedans and SUVs commonly have 5-lug arrangements. Heavy-duty trucks often use 6-lug patterns, and large commercial vehicles frequently employ 8-lug configurations.
Visual inspection provides the simplest method for counting wheel studs. We examine the wheel face directly and count each visible lug hole systematically. Starting from the top position and moving clockwise ensures we don’t miss any holes or count the same hole twice.
| Lug Count | Common Vehicle Types | Example Applications |
|---|---|---|
| 4 | Compact cars, small sedans | Honda Civic, Toyota Corolla |
| 5 | Mid-size sedans, SUVs | Honda Accord, Toyota Camry |
| 6 | Pickup trucks, larger SUVs | Ford F-150, Chevrolet Silverado |
| 8 | Heavy-duty trucks, commercial vehicles | Ford F-250, Chevrolet 2500 |
Physical verification confirms our count when visual inspection proves challenging. We can run our finger around the wheel’s circumference to feel each lug hole position. This tactile method works particularly well when dealing with dirty wheels or poor lighting conditions.
Documentation of our lug count prevents confusion during the measurement phase. We record this number before proceeding to the distance measurement step, as the counting method directly influences how we calculate the stud pattern dimensions.

Measuring 4-Lug and 6-Lug Wheel Patterns

Precise measurement techniques differ between 4-lug and 6-lug configurations due to their unique geometric arrangements. Different approaches ensure accurate results for each pattern type.
Measuring 4-Lug Patterns
Center-to-center measurement provides the most straightforward approach for 4-lug patterns. We measure the distance from the center of one lug hole to the center of the lug hole directly across from it to determine the bolt circle diameter.
Diagonal measurement serves as an alternative verification method for 4-lug wheels. This technique involves measuring from the center of one hole to the center of the diagonal hole opposite to it.
| Method | Description | Application |
|---|---|---|
| Center-to-Center | Direct measurement across opposing holes | Primary measurement technique |
| Diagonal | Cross-pattern measurement | Verification and double-checking |
Accuracy increases when we take multiple measurements at different positions around the wheel. Common 4-lug patterns include 4x100mm for compact vehicles and 4×114.3mm for larger passenger cars.
Measuring 6-Lug Patterns
Center-to-center methodology applies to 6-lug patterns similarly to 4-lug configurations but involves measuring across directly opposing lug holes. We identify the hole positioned exactly across from our starting point to obtain the bolt circle diameter.
Adjacent holes measurement offers a verification technique exact to 6-lug patterns. This method measures the distance between centers of two neighboring studs to confirm pattern accuracy.
| Configuration | Measurement Points | Common Sizes |
|---|---|---|
| 6-Lug Standard | Opposite hole centers | 6×139.7mm, 6x135mm |
| Adjacent Verification | Neighboring stud centers | Varies by manufacturer |
Safety protocols remain essential during measurement procedures regardless of lug count. We ensure vehicles rest on flat surfaces with wheels cooled from recent driving before beginning measurements.
Specification verification through owner’s manuals or existing wheel markings provides additional confirmation of our measured results. Bolt patterns convert between inches and millimeters depending on manufacturer standards and regional preferences.

Measuring 5-Lug Wheel Patterns

Measuring 5-lug wheel patterns requires a different approach than even-numbered configurations since the lug holes aren’t directly opposite each other. We start by confirming our wheel has exactly 5 lug holes evenly spaced around the wheel hub.
The measurement process begins with selecting any lug hole as our starting reference point. From this chosen hole, we measure to the outer edge of the lug hole positioned two spaces away across the circle. This creates a diagonal measurement that spans the bolt circle diameter.
5-Lug Measurement Technique
The key difference with 5-lug patterns lies in the positioning strategy. Instead of measuring directly across like we do with 4-lug or 6-lug patterns, we skip one lug hole and measure to the second hole over. This accounts for the odd number spacing where no lug holes sit directly opposite each other.
We place our measuring tape at the center of our starting lug hole and extend it to the outer edge of the target hole. Some mechanics prefer measuring from center to center of the two holes for consistency. Both methods produce the bolt circle diameter when executed correctly.
Recording 5-Lug Measurements
The measurement we obtain represents the bolt circle diameter of our wheel. Common 5-lug patterns include 5x100mm, 5×114.3mm, 5x120mm, and 5x127mm depending on vehicle type and manufacturer specifications.
| Pattern | Common Applications | Measurement Distance |
|---|---|---|
| 5x100mm | Subaru, Volkswagen | 100mm across bolt circle |
| 5×114.3mm | Honda, Nissan, Ford | 114.3mm across bolt circle |
| 5x120mm | BMW, Land Rover | 120mm across bolt circle |
| 5x127mm | GM trucks, older American cars | 127mm across bolt circle |
We express our final result as “5 x [measurement]” where the first number indicates five lug holes and the second number shows our measured diameter in millimeters or inches. Double checking our measurement ensures accuracy since 5-lug patterns can be challenging for first-time measurers.
The bolt circle diameter measurement applies regardless of whether we use metric or imperial units. Converting between millimeters and inches helps verify our results when cross-referencing manufacturer specifications or aftermarket wheel compatibility charts.
Measuring 8-Lug and 10-Lug Wheel Patterns

Large vehicles and commercial trucks typically feature 8-lug and 10-lug patterns that require exact measurement techniques for accurate assessment. These patterns demand a direct center-to-center measurement approach since the even number of lugs allows for precise diagonal calculations across the bolt circle.
8-lug patterns use the center-to-center measurement between two studs positioned directly opposite each other on the wheel hub. We locate one stud and identify its counterpart directly across the hub’s center point. Measuring from the center of the first stud to the center of the opposite stud provides the bolt circle diameter. Common 8-lug patterns include 8x170mm found on Ford Super Duty trucks and 8x200mm used on heavy-duty commercial vehicles.
10-lug patterns follow the identical measurement methodology as 8-lug configurations. Finding two studs positioned directly across from each other enables accurate diameter calculation of the bolt circle. We measure from center point to center point of these opposing studs to determine the pattern specification. Most 10-lug patterns appear on commercial trucks and specialized heavy-duty applications with measurements like 10x225mm or 10x285mm.
Verification becomes essential for these larger patterns since measurement errors can result in costly wheel purchasing mistakes. Double checking our measurements against the vehicle’s specifications in the owner’s manual or manufacturer documentation confirms accuracy. Using a bolt pattern guide provides additional confirmation that our measured values match standard industry specifications.
Professional measuring tools like calipers offer enhanced precision for these larger patterns where measurement accuracy directly impacts wheel fitment safety. Recording measurements in both metric and imperial units allows for cross-reference with various wheel manufacturer specifications since different brands may list patterns in different measurement systems.
Common Wheel Stud Pattern Sizes by Vehicle Type

Different vehicle categories use exact wheel stud patterns based on their weight requirements and structural demands. Understanding these standard configurations helps identify the correct pattern for your vehicle type.
Passenger Cars
Passenger cars typically feature smaller wheel stud patterns designed for lighter vehicle weights and standard road conditions. Most compact and midsize vehicles use 4-lug configurations, with 4x100mm being the predominant pattern for smaller cars like Honda Civic, Toyota Corolla, and Nissan Sentra models.
Mid-range sedans and crossovers commonly adopt 4×114.3mm patterns, which provide enhanced stability for slightly heavier vehicles. European manufacturers often specify 5×114.3mm patterns for their sedan and hatchback models, offering improved weight distribution across five mounting points.
Luxury passenger vehicles frequently use 5x120mm patterns, particularly BMW and Mercedes-Benz models that require robust mounting systems for their enhanced performance capabilities. Sport-oriented cars may feature unique patterns like 5x112mm or 5x108mm depending on manufacturer specifications and regional market requirements.
Trucks and SUVs
Trucks and SUVs demand larger wheel stud patterns to accommodate increased vehicle weight and towing capabilities. Light-duty trucks commonly use 5x127mm patterns, which provide adequate strength for moderate payload and towing applications.
Mid-size SUVs and pickup trucks typically feature 6x135mm patterns, offering six mounting points for enhanced load distribution. This configuration appears frequently on Ford F-150 models and similar weight-class vehicles that require balanced performance between passenger comfort and utility capabilities.
Heavy-duty trucks use 8×165.1mm patterns to handle extreme weight loads and commercial applications. These eight-point mounting systems distribute forces effectively across larger wheel assemblies, ensuring safety during heavy hauling operations.
Commercial vehicles and one-ton trucks often specify 8x170mm patterns for maximum strength and durability. Dual-wheel configurations on heavy-duty trucks may require specialized patterns that accommodate the increased stress from commercial usage and extended load cycles.
Converting Between Metric and Imperial Measurements

Converting measurements between metric and imperial units becomes essential when cross-referencing wheel stud patterns with manufacturer specifications or aftermarket wheel options. We use a simple formula to convert millimeters to inches by dividing the metric measurement by 25.4.
Most automotive manufacturers list wheel stud patterns in millimeters while some aftermarket brands display measurements in inches. Converting 100mm to inches requires dividing 100 by 25.4 which equals 3.94 inches. Converting 114.3mm follows the same process resulting in 4.5 inches.
| Metric Measurement | Imperial Conversion | Common Application |
|---|---|---|
| 98mm | 3.86 inches | Compact cars |
| 100mm | 3.94 inches | Small vehicles |
| 114.3mm | 4.5 inches | Mid-size sedans |
| 120mm | 4.72 inches | European luxury cars |
| 127mm | 5.0 inches | Light trucks |
Recording measurements in both metric and imperial units provides verification against different manufacturer specifications. Converting imperial measurements to metric requires multiplying the inch measurement by 25.4. Converting 4.5 inches to millimeters equals 114.3mm while 5.0 inches converts to 127mm.
Double-checking conversions prevents costly wheel fitting mistakes especially when ordering aftermarket wheels from international suppliers. We recommend using a digital calculator or conversion app to ensure precision since rounding errors can lead to incompatible wheel selections.
Manufacturers typically stamp both metric and imperial measurements on wheel specifications labels. Verifying our calculated conversions against these factory markings confirms measurement accuracy before purchasing new wheels or making modifications.
Tips for Accurate Wheel Stud Pattern Measurement

Measuring multiple times ensures consistency and prevents costly fitting mistakes when selecting new wheels. We recommend checking your measurement 2 to 3 times using the same technique to verify accuracy across different attempts.
Converting measurements to millimeters provides the most compatibility when cross-referencing wheel specifications from various manufacturers. Most automotive wheel patterns use metric measurements as the standard notation, making millimeter readings essential for proper fitment verification.
Recording measurements immediately after taking them prevents confusion and ensures accurate documentation for future reference. We suggest writing down both the lug count and diameter measurement in a clear format such as “5×114.3mm” to maintain consistency with industry standards.
Consulting your vehicle’s owner manual confirms manufacturer specifications and validates your measured results. Vehicle documentation typically includes the exact bolt pattern along with wheel size recommendations, providing an authoritative reference point for verification.
Using proper lighting improves visibility when identifying lug hole centers and measuring distances accurately. Poor lighting conditions can lead to measurement errors, particularly when working with smaller bolt patterns or when distinguishing between hole edges and centers.
Measurement Accuracy Guidelines
| Tool Type | Accuracy Level | Best Application |
|---|---|---|
| Tape Measure | ±1-2mm | General measurements |
| Digital Calipers | ±0.1mm | Precision work |
| Bolt Pattern Gauge | ±0.5mm | Professional verification |
Checking existing wheel markings saves time and provides immediate pattern identification when visible stamps or labels remain readable. Many wheels display their bolt pattern directly on the rim or hub area, eliminating the need for manual measurement.
Taking photographs of your measurement setup creates a visual record for later verification and helps maintain consistency across multiple measurement attempts. Digital images also allow you to zoom in on exact details and share measurements with wheel retailers or mechanics for confirmation.
Avoiding temperature extremes during measurement prevents material expansion or contraction that could affect accuracy. Metal components expand in heat and contract in cold temperatures, potentially altering the spacing between lug holes by small but important amounts.

Conclusion
We’ve equipped you with the essential knowledge and techniques to accurately measure your wheel stud pattern. Armed with the right tools and our step-by-step methods you can confidently determine whether you need a 4-lug 5-lug or even 8-lug configuration.
Remember that precision matters when it comes to wheel safety. Taking multiple measurements and converting between metric and imperial units ensures you’ll get the perfect fit every time. Whether you’re upgrading to performance wheels or simply replacing worn ones proper measurement protects both your investment and your safety on the road.
Now you can shop for wheels with confidence knowing exactly what stud pattern your vehicle requires. No more guesswork or costly returns – just the peace of mind that comes from getting it right the first time.
Frequently Asked Questions
What is a wheel stud pattern and why is it important?
A wheel stud pattern, also known as bolt or lug pattern, defines the arrangement of bolts or studs that secure the wheel to the vehicle’s hub. It’s measured by counting the number of bolts and determining the distance between them. This pattern is crucial for proper wheel installation, weight distribution, and safety. An incorrect pattern can lead to wheel failure, uneven stress distribution, and potential wheel detachment while driving.
How do I read wheel stud pattern measurements?
Wheel stud patterns are expressed as two numbers, such as 5×114.3 or 4×100. The first number indicates the bolt count (number of lug holes), while the second represents the diameter of the circle formed by the bolt centers in millimeters. For example, 5×114.3 means 5 bolts arranged in a circle with a 114.3mm diameter.
What tools do I need to measure my wheel stud pattern?
For basic measurements, you’ll need a tape measure or ruler. For greater precision, especially with 5-lug patterns, calipers or bolt pattern gauges are recommended. Additional helpful tools include pencil and paper for documentation, a phone camera for reference photos, and measurement conversion apps. Most measurements can be done accurately with simple household measuring tools.
How do I measure a 4-lug wheel pattern?
For 4-lug patterns, measure center-to-center between opposite lug holes (diagonally across). This gives you the bolt circle diameter directly. Common 4-lug patterns include 4x100mm and 4×114.3mm. Always double-check your measurement and ensure the vehicle is on a flat surface with cooled wheels for accuracy.
How is measuring a 5-lug pattern different from other patterns?
5-lug patterns require a different approach due to uneven spacing. Start from a reference lug hole and measure diagonally to the outer edge of the lug hole two spaces away. This measurement corresponds to the bolt circle diameter. Common 5-lug patterns include 5x100mm, 5×114.3mm, 5x120mm, and 5x127mm.
What are the most common wheel stud patterns by vehicle type?
Compact cars typically use 4x100mm, while many sedans and SUVs feature 5×114.3mm. Light-duty trucks often use 5x127mm or 6×139.7mm patterns. Heavy-duty trucks require larger patterns like 8x170mm or 8x200mm. Commercial vehicles may use 10-lug patterns such as 10x225mm or 10x285mm for maximum load capacity.
How do I convert between metric and imperial measurements?
To convert millimeters to inches, divide by 25.4. To convert inches to millimeters, multiply by 25.4. Use digital calculators or conversion apps for precision. Many manufacturers stamp both metric and imperial measurements on wheel specifications labels, which can help verify your calculated conversions before making purchases.
What mistakes should I avoid when measuring wheel stud patterns?
Avoid measuring in extreme temperatures, which can affect accuracy due to material expansion. Don’t measure just once – take multiple measurements for consistency. Always convert measurements to millimeters for compatibility with most wheel specifications. Record measurements immediately to prevent confusion, and use proper lighting to improve visibility during measurement.
Can I use my existing wheel markings to identify the stud pattern?
Yes, many wheels have stud pattern markings stamped on them, typically on the back or inner rim. Look for numbers like “5×114.3” or similar. This can save time and provide quick identification. However, if markings are unclear or missing, manual measurement is necessary. Always verify markings against your measurements for accuracy.
When should I consult a professional for wheel stud pattern measurement?
Consider professional help for critical applications, precision requirements, or if you’re unsure about your measurements. Professional mechanics have specialized tools like digital calipers and bolt pattern gauges for enhanced accuracy. This is especially important for performance modifications, commercial vehicles, or when costly wheel purchases are involved.