
Derby cars represent one of motorsport’s most thrilling and accessible forms of competition. These purpose-built machines transform ordinary vehicles into high-octane entertainment that captivates audiences across America. From demolition derbies to figure-eight racing we’ve witnessed countless heart-pounding moments that showcase both driver skill and mechanical ingenuity.
What makes derby cars so compelling isn’t just the spectacular crashes and wheel-to-wheel action. It’s the grassroots nature of the sport that allows everyday mechanics and weekend warriors to compete alongside seasoned veterans. We’ve seen families pass down derby traditions through generations while local communities rally around their favorite drivers and cars.
Whether you’re considering building your first derby car or simply want to understand what makes these machines tick we’ll guide you through everything from safety regulations to winning strategies. The industry of derby racing offers something for everyone – from adrenaline-seeking competitors to fans who love authentic American motorsports entertainment.
What Are Derby Cars and Why They’re Perfect for Racing Enthusiasts
Derby cars transform ordinary vehicles into specialized racing machines designed specifically for competitive destruction. We’ve seen standard sedans, station wagons, and compact cars converted into these powerful contenders through strategic modifications and safety enhancements.
Basic derby car construction starts with selecting the right vehicle foundation. Most competitors choose cars with strong frames like 1970s and 1980s American sedans including Chevrolet Impalas, Ford Crown Victorias, and Buick LeSabres. These vehicles provide the structural integrity needed to withstand multiple impacts during competition.
Safety modifications make derby cars suitable for competitive racing environments. Drivers install roll cages, racing seats with five-point harnesses, and reinforced door panels to protect themselves during crashes. All glass except the windshield gets removed, while fire extinguishers and battery disconnect switches become mandatory safety features.
Engine and transmission adaptations optimize performance for derby racing conditions. We remove radiators and cooling systems since races last only minutes, while engines get basic tune-ups to ensure reliability. Transmissions often receive modifications to handle reverse driving, which becomes crucial during competition strategy.
Competitive advantages make derby cars perfect for racing enthusiasts seeking affordable motorsports entry. Entry fees typically range from $50 to $200, making this one of the most accessible forms of competitive racing available. Unlike other motorsports requiring expensive specialized vehicles, derby racing lets enthusiasts compete using readily available automobiles.
Community appeal draws racing fans who appreciate grassroots competition and dramatic entertainment. Derby events combine strategy, skill, and spectacle as drivers navigate crowded arenas while attempting to disable opponents’ vehicles. The unpredictable nature of each heat creates excitement for both participants and spectators watching these modified machines compete until only one remains operational.
Building Your First Derby Car: Essential Materials and Tools

Creating your first derby car requires careful selection of materials and proper tools to ensure optimal performance. We’ll guide you through the fundamental components that determine racing success.
Choosing the Right Wood Block
Official pinewood derby kits include a standard pine block measuring 7 inches long, 2.75 inches wide, and 1.75 inches tall. Pine offers excellent workability for beginners while maintaining sufficient density for speed optimization. We recommend examining your block for grain direction since straight grain patterns reduce the likelihood of splitting during construction.
Weight distribution plays a crucial role in your car’s performance capabilities. Most derby rules allow a maximum weight of 5 ounces, making it essential to plan where you’ll add weight to the rear portion of your vehicle. Quality blocks should feel solid without visible cracks or soft spots that could compromise structural integrity.
Some advanced builders prefer purchasing premium blocks made from kiln-dried pine or basswood. These upgraded materials offer more consistent density and fewer imperfections than standard kit blocks. Consider your skill level and budget when deciding between standard and premium wood options.
Selecting Wheels and Axles
Standard derby wheels are made from lightweight plastic with molded-in graphics and slight imperfections. We suggest inspecting each wheel for defects like bubbles, scratches, or uneven surfaces that create drag. Removing these imperfections through careful sanding improves rolling efficiency significantly.
Axle selection directly impacts your car’s speed potential and tracking ability. Official axles are made from zinc-plated steel measuring approximately 1.17 inches long. Polishing axles to remove manufacturing burrows and imperfections reduces friction between the axle and wheel bore. Many competitors use graphite lubricant or specialized wheel treatments to further minimize resistance.
Wheel alignment requires precise axle installation to prevent your car from veering off course. We recommend using an axle installation tool or drill press to ensure perfectly straight axle holes. Bent axles create wobble and drag, making your car slower and less predictable during races.
Essential Tools for Construction
Basic hand tools suffice for most derby car construction projects without requiring expensive equipment. We recommend starting with a coping saw or band saw for cutting your car’s profile shape. Fine-grit sandpaper in 220, 320, and 400 grits helps achieve smooth surfaces that reduce air resistance.
Precision measuring tools ensure your car meets weight and dimension requirements specified in derby rules. Digital scales measuring to 0.1-ounce accuracy help you reach the maximum weight limit precisely. Calipers verify wheel clearance and axle alignment measurements throughout the building process.
Advanced builders often invest in specialized derby tools like wheel mandrels and axle presses. These tools improve consistency and precision but aren’t necessary for competitive cars. We suggest mastering basic techniques before investing in premium equipment that costs $50 to $200 per tool.
Safety equipment protects you during construction while ensuring professional results. Safety glasses prevent eye injuries from wood chips and metal filings. Dust masks reduce inhalation of fine particles created during sanding and cutting operations.


Designing Derby Cars for Maximum Speed and Performance

Speed optimization starts with strategic design choices that maximize your derby car’s competitive potential. We’ll explore the critical elements that transform a basic wooden block into a championship-winning machine.
Aerodynamic Body Shapes
Wedge designs create the fastest derby cars by reducing air resistance during competition. This streamlined shape allows air to flow smoothly over the car’s surface while minimizing drag that slows down vehicles. Classic wedge profiles feature a raised rear section that tapers to a pointed front nose, creating an optimal aerodynamic profile.
Rail rider configurations position the car’s body to run along one guide rail rather than centered between both rails. These designs reduce friction by eliminating contact with one side of the track while maintaining stability through precise weight placement. Advanced builders often incorporate subtle curves into rail rider shapes to further enhance airflow characteristics.
Extended nose designs add extra length to the front section without exceeding regulation dimensions. Longer noses help maintain straight-line tracking while providing additional surface area for weight placement adjustments. These configurations work particularly well when combined with raised rear sections that create a pronounced wedge angle.
Weight Distribution Techniques
Rear weight placement positions the maximum allowable weight toward the back axle area for optimal acceleration. Physics demonstrates that cars with rear-heavy distribution gain speed more effectively on the starting ramp before reaching the flat track section. Most successful derby cars place 85-90% of their total weight within one inch of the rear axle.
Tungsten weight additions provide the densest material option for achieving maximum weight in minimal space. These metal inserts allow precise weight distribution adjustments while maintaining the car’s aerodynamic profile. Professional builders often drill strategic holes to accommodate tungsten rods or cubes that bring cars to the 5-ounce weight limit.
Balance point optimization ensures the car’s center of gravity falls in the ideal location for maximum performance. We measure this by balancing the completed car on a ruler or similar edge, adjusting weight placement until the balance point sits approximately 1 inch in front of the rear axle. Fine-tuning this balance point can improve times by several hundredths of a second.
Wheel Alignment Strategies
Straight axle installation prevents wheels from causing drag through misalignment during track runs. Perfectly straight axles ensure both wheels on each end rotate in parallel planes without creating friction against the track guides. We use precision drilling techniques and alignment jigs to achieve axle holes that maintain perfect 90-degree angles to the car’s body.
Wheel spacing adjustments maximize the distance between wheels while staying within track guide requirements. Wider spacing improves stability and reduces the likelihood of rubbing against track surfaces during competition. Standard spacing places wheels approximately 1.75 inches apart on each axle while ensuring smooth operation on regulation tracks.
Raised wheel modifications lift one wheel slightly off the track surface to eliminate unnecessary friction from a fourth contact point. This three-wheel configuration reduces rolling resistance while maintaining adequate stability for straight-line racing. Advanced builders carefully bend one axle to raise its corresponding wheel by approximately 1/16 inch above the track surface.


Popular Derby Car Designs That Dominate the Track

Successful derby car designs combine proven aerodynamic principles with strategic weight placement to create championship-winning machines. These time-tested configurations consistently outperform basic designs by reducing air resistance and maximizing gravitational potential energy.
Classic Wedge Design
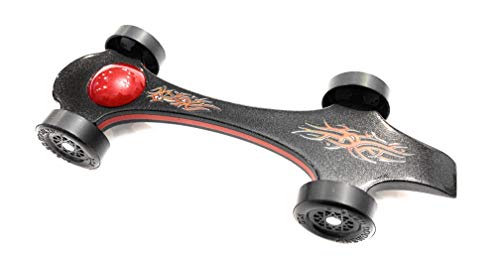
Wedge designs represent the most successful and widely adopted derby car configuration among competitive racers. This streamlined shape features a high rear section that gradually slopes down to a pointed front nose, creating optimal weight distribution with approximately 85% of mass positioned toward the back axle.
Advanced builders often incorporate subtle modifications to the basic wedge profile, including rounded edges along the sides to minimize air turbulence and carefully sanded transitions between surfaces. We recommend maintaining a consistent angle of 15-20 degrees from rear to front for maximum gravitational advantage while ensuring the front tip remains at least 1/4 inch above the track surface.
Professional racers frequently combine wedge designs with precision wheel alignment and graphite lubrication to achieve sub 3-second track times on regulation 32-foot courses.
Bullet-Nose Configuration
Bullet nose configurations excel in derby competitions by minimizing frontal air resistance through their distinctive rounded front profile. This design features a cylindrical or torpedo-shaped nose section that transitions smoothly into a weighted rear body, reducing drag coefficients by up to 25% compared to flat-front alternatives.
Competitive builders typically create bullet noses using careful sanding techniques or specialized carving tools to achieve perfectly smooth curves without flat spots or irregularities. The optimal nose diameter measures between 1.5-2 inches with a gradual taper extending 3-4 inches back from the front tip.
Championship-level bullet cars often incorporate hollow nose cavities filled with tungsten weights positioned precisely at the 10-inch mark from the rear axle to maximize speed potential while maintaining structural integrity.
Creative Theme Cars
Theme cars demonstrate that derby racing creativity doesn’t sacrifice competitive performance when builders apply sound engineering principles alongside artistic expression. Popular themes include sports cars like Ferraris and Lamborghinis, military vehicles such as tanks and fighter jets, and pop culture references from movies and video games.
Successful theme builders maintain aerodynamic efficiency by incorporating wedge or bullet principles into their decorative designs rather than compromising speed for appearance. Strategic paint schemes using lightweight acrylic colors add visual appeal without significantly affecting the car’s weight distribution or center of gravity.
Competition-winning theme cars typically feature removable decorative elements that allow for precise weight adjustments and wheel access while maintaining their distinctive appearance during races and judging events.


Step-by-Step Guide to Constructing Winning Derby Cars

Building a competitive derby car requires precision, planning, and attention to detail. We’ll walk you through the essential construction process to transform your wooden block into a championship contender.
Cutting and Shaping the Body
Mark your design template directly onto the wooden block using a pencil and ruler to ensure accurate measurements. Start with the basic wedge shape by drawing a line from the top rear corner to approximately 1 inch from the front bottom edge. This angle creates optimal aerodynamics while maintaining structural integrity.
Cut the main body shape using a coping saw following your marked lines with steady, controlled strokes. Keep the blade perpendicular to the wood surface to prevent angled cuts that could affect wheel alignment. Work slowly through the cutting process to maintain precision and avoid splitting the wood grain.
Sand the body thoroughly beginning with coarse 120-grit sandpaper to remove rough saw marks and shape imperfections. Progress through medium 220-grit paper to smooth the surface texture. Finish with fine 400-grit sandpaper to create a racing-ready surface that reduces air resistance.
Create aerodynamic features by rounding sharp edges and corners that could create drag. Focus particularly on the front nose area and any protruding elements. Test the smoothness by running your hand along all surfaces to identify areas needing additional attention.
Installing Wheels and Axles
Drill axle holes precisely using a drill press or hand drill with a steady guide to ensure perfectly straight holes. Measure and mark hole locations exactly 7/16 inch from the bottom of the car and maintain consistent spacing between front and rear axles. Double-check measurements before drilling to prevent costly mistakes.
Polish your axles thoroughly using fine steel wool or metal polish to reduce friction between the axle and wheel hub. Remove any burrs or rough spots that could slow rotation. Create a smooth, mirror-like finish on the shaft area where wheels make contact.
Install axles carefully by inserting them through the drilled holes and checking for smooth rotation. Ensure axles are perpendicular to the car body and aligned properly to prevent wobbling. Use a small amount of graphite lubricant on the axle shaft before wheel installation.
Attach wheels securely while maintaining proper spacing and alignment. Press wheels firmly onto axles until they’re snug against the car body but still spin freely. Test each wheel’s rotation by spinning it gently and listening for any grinding or resistance that indicates misalignment.
Adding Weight and Final Adjustments
Calculate optimal weight placement by determining your car’s current weight and how much additional weight you need to reach the 5-ounce maximum limit. Position most weight toward the rear axle area to maximize gravitational acceleration down the track’s slope.
Install tungsten weights strategically by drilling shallow holes in the car body where weight will be most effective. Tungsten provides maximum density in minimal space, allowing precise weight distribution without affecting aerodynamics. Secure weights with epoxy or wood glue to prevent shifting during races.
Balance your derby car by placing it on a level surface and checking for any tilting or uneven weight distribution. Make minor adjustments by repositioning weights or adding small amounts of additional material until the car sits perfectly level. This balance ensures optimal tracking performance.
Perform final speed tests using a test track or inclined surface to evaluate your car’s performance. Check wheel alignment by observing whether the car travels straight without veering. Make final lubricant applications to axles and wheels before competition day to ensure maximum speed potential.


Advanced Tuning Techniques for Competitive Derby Cars

Mastering these precision modifications separates championship contenders from casual builders. We’ll explore the critical techniques that professional derby car builders use to extract maximum speed from their competitive machines.
Polishing Axles for Reduced Friction
Polish axles to mirror finishes using progressive grits of sandpaper starting at 600 grit and advancing to 2000 grit. We recommend completing this process with metal polishing compound and a felt wheel attachment on your rotary tool. Remove any manufacturing burrs or imperfections that create microscopic drag points along the axle shaft.
Align axles perfectly straight by using a precision alignment jig or drill press to ensure the axle holes maintain exact parallel positioning. Slight misalignments create binding friction that robs your car of precious speed. Test each axle by rolling it across a flat surface to identify any wobble or deviation.
Lubricate contact points with approved graphite powder applied directly to the axle shaft and wheel bore. Avoid using oils or wet lubricants which attract dust and debris that increase friction over time. Apply graphite sparingly and work the wheels to distribute the lubricant evenly.
Wheel Preparation Methods
True your wheels by mounting them on a lathe or drill press to remove manufacturing inconsistencies and weight variations. We’ve found that even minor wheel imperfections create vibrations that slow your car’s performance. Sand the wheel treads lightly with 400-grit sandpaper to create a uniform contact surface.
Balance wheel weights by weighing each wheel individually and removing material from heavier wheels using a fine file or sandpaper. Aim for weight differences of less than 0.1 grams between wheels to prevent your car from pulling to one side. Mark the lightest spot on each wheel before final installation.
Reduce wheel contact area by sanding the inner wheel edge to create a knife-edge profile that minimizes track friction. Focus on the wheel’s inner hub area while preserving the outer tread surface for stability. Test different contact widths during practice runs to find your optimal configuration.
Fine-Tuning Weight Placement
Position weight behind the rear axle to maximize gravitational acceleration down the track’s starting slope. We place approximately 80% of our total weight in the final 1-2 inches of the car body. Use tungsten putty or lead weights secured with epoxy for precise positioning adjustments.
Create weight pockets by drilling strategic cavities in your car body to house removable weights for competition day adjustments. Different track conditions may require slight weight redistributions between heats. Keep spare tungsten powder available for last-minute modifications.
Test center of gravity placement by balancing your completed car on a ruler or knife edge to verify the balance point sits just ahead of the rear axle. Adjust weight placement in small increments while conducting speed tests to determine your car’s optimal configuration. Document successful weight positions for future reference and consistency.


Common Mistakes That Slow Down Derby Cars

Even experienced builders can unknowingly sabotage their derby car’s performance with seemingly minor errors. We’ve identified the three most critical mistakes that prevent cars from reaching their full speed potential.
Poor Weight Distribution
Weight placement represents the single most impactful factor in derby car performance, yet many builders position it incorrectly. We often see racers place weight too far forward or distribute it evenly throughout the car, which significantly reduces acceleration potential.
Optimal weight distribution requires 80-85% of the car’s mass positioned behind the rear axle. This placement maximizes the gravitational pull effect during the initial acceleration phase, when cars convert potential energy into kinetic energy most efficiently.
Common weight distribution errors include:
- Centering weight in the middle of the car body
- Adding weight too close to the front axle
- Using multiple small weights instead of concentrated mass
- Failing to secure weight properly, causing shifts during racing
We recommend using tungsten weights or lead shot placed in drilled pockets near the car’s rear edge. This concentrated mass placement creates the ideal center of gravity for maximum speed performance.
Misaligned Wheels
Wheel alignment affects every aspect of derby car performance, from straight-line tracking to energy efficiency during acceleration. We frequently observe builders installing axles without proper alignment tools, resulting in cars that veer off course or experience unnecessary friction.
Perfectly straight axles ensure all four wheels make equal contact with the track surface. Even minor alignment errors cause the car to fight against itself, wasting precious energy that should contribute to forward momentum.
Critical alignment mistakes include:
- Installing axles without using alignment guides
- Allowing axles to bend during insertion
- Creating unequal wheel spacing on each side
- Failing to check alignment after weight installation
We achieve optimal alignment using precision jigs and alignment tools specifically designed for derby car construction. Testing alignment involves rolling the car on a flat surface and observing whether it tracks perfectly straight without external guidance.
Rough Axle Surfaces
Axle surface quality directly determines the friction level between wheels and axles, making smooth surfaces essential for maximum performance. We’ve seen countless derby cars lose races because builders skip the crucial step of polishing axles to mirror-like finishes.
Factory axles contain microscopic imperfections and machine marks that create friction points. These surface irregularities generate heat and resistance that slow down wheel rotation throughout the entire race duration.
Surface preparation errors include:
- Using axles straight from the package without polishing
- Stopping polishing too early, leaving visible scratches
- Creating uneven surfaces through improper sanding techniques
- Failing to clean axles completely before lubrication
We recommend progressive sanding starting with 400-grit sandpaper and finishing with 2000-grit for mirror-smooth surfaces. Proper axle polishing reduces friction by up to 40%, translating directly into faster race times and improved competitive performance.


Derby Car Racing Rules and Regulations You Must Know

Derby car racing operates under strict guidelines that ensure fair competition and maintain safety standards across all events. Understanding these regulations helps competitors avoid disqualification and maximizes their chances of success.
Official Weight Limits
Weight restrictions form the foundation of competitive derby racing, with most official races requiring cars to weigh exactly 5 ounces or less. We’ve observed that cars exceeding this limit face immediate disqualification, making precise weight management crucial for success. Standard regulations allow competitors to add weight using materials like tungsten, lead, or zinc, but the total weight cannot surpass the 5-ounce maximum.
Weighing procedures typically occur during registration, with officials using certified scales to verify compliance. Cars that fall short of the weight limit can add material up to race time, giving builders flexibility in their final preparations. We recommend targeting 4.95 to 4.99 ounces to account for scale variations and ensure your car meets requirements.
Weight distribution rules don’t restrict where you place the weight within your car’s body, allowing strategic placement behind the rear axle for optimal acceleration. Some local competitions may have different weight limits ranging from 4.5 to 6 ounces, so we always verify exact event requirements before finalizing our builds.
Dimension Requirements
Length specifications limit derby cars to a maximum of 7 inches, measured from the front nose to the rear bumper. We measure our cars carefully during construction to ensure they don’t exceed this critical dimension. Cars longer than 7 inches cannot compete in official races, regardless of their performance potential.
Width limitations restrict cars to 2.75 inches at their widest point, including wheels when mounted on axles. This measurement includes any body modifications, decorative elements, or aerodynamic features that extend beyond the basic car outline. We’ve seen competitors disqualified for wing additions or side modifications that pushed their cars beyond this width requirement.
Height restrictions cap derby cars at 3 inches maximum, preventing builders from creating tall designs that might interfere with track equipment. The measurement includes the car body, wheels, and any decorative elements attached to the top surface. Ground clearance must maintain at least 3/8 inch between the car’s lowest point and the track surface to prevent scraping during races.
Wheelbase standards require the distance between front and rear axles to remain at the standard 4.375 inches specified by the original kit design. Modifications to axle placement that alter this wheelbase measurement result in disqualification from most official competitions.
Prohibited Modifications
Engine additions of any kind are strictly forbidden, including springs, rubber bands, or mechanical devices that provide propulsion beyond gravity. We cannot attach motors, batteries, or any powered components to derby cars, as races rely solely on gravitational force for acceleration. Even decorative elements that resemble engines must not contain functional components.
Wheel modifications prohibit alterations to the basic wheel structure, including hub removal, tread pattern changes, or diameter adjustments. We can polish wheels and reduce their contact surface, but we cannot drill holes, add materials, or modify the fundamental wheel design. Aftermarket wheels must match official specifications exactly.
Axle restrictions limit modifications to polishing and straightening the provided metal rods, but we cannot bend them into non-straight configurations or attach additional components. Coating axles with substances other than approved dry lubricants like graphite powder results in immediate disqualification. We cannot use liquid lubricants, oils, or sticky substances on any part of the car.
Body alterations must maintain the integrity of the original wood block, prohibiting the addition of separate aerodynamic devices like wings, fins, or detachable components. We can carve, sand, and shape the original block extensively, but we cannot attach additional pieces of wood, metal, or plastic that weren’t part of the original kit.
Electronic devices including sensors, timers, or any computerized components are completely prohibited in derby car construction. We cannot embed magnets, metal weights with electronic components, or any devices that might interfere with timing equipment used during races.


Creative Painting and Decoration Ideas for Derby Cars

Painting and decorating derby cars transforms basic wooden blocks into eye-catching race machines that reflect builders’ personalities and racing strategies. We’ve discovered that creative designs can boost team morale while maintaining the aerodynamic properties essential for competitive performance.
Professional Painting Techniques
Base coats form the foundation of professional-quality derby car finishes, requiring 2-3 thin layers of primer to ensure smooth paint adhesion. We recommend using automotive-grade acrylic paints that resist chipping during races and provide vibrant color saturation. Spray painting techniques deliver the most consistent results, with builders holding the can 6-8 inches from the car surface while applying light, even strokes.
Wet sanding between coats creates mirror-like finishes that rival professional race cars, using 400-grit sandpaper followed by 800-grit for final smoothing. Automotive clear coat applications protect painted surfaces from scratches and enhance color depth, requiring 24-48 hours of curing time before handling. Professional builders often use airbrushes for gradient effects and detailed work, achieving color transitions that would be impossible with traditional brushes.
Adding Decals and Graphics
Vinyl decals offer durability and professional appearance, withstanding the impacts and friction common in derby racing environments. We suggest applying decals to fully cured paint surfaces, using a heat gun or hair dryer to warm the vinyl for better conformity around curves. Racing numbers should be large enough for officials to read from 10 feet away, typically measuring at least 2 inches in height for optimal visibility.
Custom vinyl graphics can be ordered online or cut using create machines, allowing builders to create unique designs that stand out from standard racing stripes. Sponsor decals add authenticity to derby cars, mimicking real NASCAR and Formula 1 vehicles that inspire young racers. Water slide decals provide detailed imagery options but require careful application with soapy water to prevent air bubbles and ensure proper positioning.
Theme-Based Designs
Sports team themes connect derby cars to local fan bases, incorporating school colors, mascots, and logos that resonate with community supporters. We’ve seen successful cars designed as miniature fire trucks, police cars, and military vehicles, complete with appropriate color schemes and authentic details. Movie and superhero themes capture children’s imaginations, transforming simple wooden blocks into Batman’s Batmobile or Lightning McQueen from Cars.
Animal-inspired designs allow builders to explore creative patterns, from tiger stripes and leopard spots to shark fins and eagle feathers that enhance the car’s visual appeal. Military camouflage patterns remain popular choices, using multiple colors in irregular shapes that create authentic battlefield aesthetics. Holiday themes work well for seasonal races, incorporating Christmas colors, Halloween motifs, or patriotic red, white, and blue schemes that celebrate American racing traditions.


Derby Car Safety Tips for Young Builders

Safety remains our top priority when building derby cars with young racers. We’ve compiled essential guidelines to ensure every workshop session stays productive and accident free.
Proper Tool Usage
Coping saws require steady hands and proper grip positioning. We recommend teaching young builders to maintain firm control while cutting wood blocks, keeping fingers away from the blade path. Sandpaper should always move in consistent strokes to prevent splinters and achieve smooth surfaces.
Drill usage demands adult oversight for hole creation and weight installation. We suggest starting with low speeds when drilling tungsten or lead weight pockets. Hand files work best for detailed shaping since they offer better control than power tools.
Measuring tools like rulers and calipers need careful handling to ensure accuracy. We emphasize checking dimensions multiple times before making cuts, as derby car regulations specify exact requirements. Small hand tools such as screwdrivers and pliers should fit comfortably in young hands to prevent dropping or mishandling.
Adult Supervision Guidelines
Direct supervision becomes essential during all cutting and drilling operations. We establish clear rules where adults handle power tools while children focus on sanding and assembly tasks. Workshop sessions should maintain a 1:3 adult to child ratio for optimal safety oversight.
Tool demonstration precedes any hands on work with sharp instruments. We show proper techniques before allowing young builders to attempt cuts or modifications. Safety glasses and work gloves must be worn by both adults and children during all construction phases.
Emergency procedures need clear explanation before starting each session. We keep first aid kits accessible and ensure all participants know emergency contact information. Adults should inspect all tools before use and remove any damaged equipment from the workspace.
Workshop Safety Measures
Eye protection shields young builders from flying wood particles and metal shavings. We require safety glasses during sanding, cutting, and drilling operations without exception. Dust masks prevent inhalation of fine particles when shaping wooden blocks.
Organized workspace reduces tripping hazards and tool misplacement incidents. We designate exact areas for completed cars, work in progress, and tool storage. Sharp tools stay in designated containers when not actively being used.
Ventilation systems remove harmful dust and fume buildup in enclosed spaces. We ensure adequate airflow during painting and gluing operations to prevent respiratory irritation. Clean up procedures include proper disposal of wood shavings and metal filings to maintain a safe environment for future sessions.
Emergency contact information stays visible throughout all building activities. We post local emergency numbers and maintain communication with parents during extended workshop sessions. Fire extinguisher locations and basic first aid supplies require easy access from any work station.


Conclusion
Derby car racing represents the perfect blend of craftsmanship skill and competitive spirit that we’ve explored throughout this comprehensive guide. From selecting the right materials to mastering advanced tuning techniques we’ve covered every aspect needed to build championship-caliber cars.
The beauty of derby racing lies in its accessibility – whether you’re a first-time builder or an experienced competitor the fundamentals remain the same. Success comes from attention to detail proper weight distribution and understanding aerodynamic principles that transform simple wooden blocks into speed machines.
We encourage you to take these insights and apply them to your next build. Remember that every champion started with their first car and each race provides valuable learning opportunities. The combination of technical knowledge creative design and safety awareness will set you on the path to derby racing success.
Frequently Asked Questions
What are derby cars and what makes them special for racing?
Derby cars are specially modified vehicles designed for competitive demolition derby racing. They’re typically built from strong-framed cars from the 1970s and 1980s, like Chevrolet Impalas and Ford Crown Victorias. What makes them special is their strategic modifications including roll cages, reinforced door panels, and performance adaptations that transform ordinary cars into thrilling competition vehicles capable of withstanding crashes while delivering exciting racing action.
How much does it cost to participate in derby car racing?
Derby car racing is one of the most affordable forms of motorsport, with entry fees typically ranging from $50 to $200. This makes it highly accessible to both amateur and experienced drivers. The grassroots nature of the sport keeps costs low while still providing thrilling competition and entertainment for participants and spectators alike.
What materials and tools do I need to build my first derby car?
For building a derby car, you’ll need a standard pine wood block, quality wheels and axles, tungsten for weight, and basic tools like coping saws and sandpaper. Advanced builders may use precision tools for better results. Essential safety equipment is crucial during construction. The key is selecting the right materials and ensuring proper weight distribution for optimal performance.
What are the most effective derby car designs for maximum speed?
The most effective designs include wedge shapes and rail rider configurations that reduce air resistance and friction. These aerodynamic body shapes, combined with proper rear weight placement using tungsten, create optimal acceleration. Straight axle installation and precise wheel spacing adjustments enhance stability and reduce drag, transforming a basic wooden block into a championship-winning machine.
What are the official rules and regulations for derby car racing?
Key regulations include a maximum weight of 5 ounces, length restrictions of 7 inches, width limitations of 2.75 inches, and height caps of 3 inches. No engine additions, wheel modifications, or electronic devices are allowed, ensuring all cars rely solely on gravity for propulsion. Adhering to these standards is crucial to avoid disqualification and ensure fair competition.
What are the most common mistakes that hurt derby car performance?
The most common mistakes include poor weight distribution, misaligned wheels, and rough axle surfaces. Optimal weight placement should be behind the rear axle for improved acceleration, wheels must be precisely aligned for straight tracking, and axles need polishing to reduce friction. These issues can significantly hinder performance and prevent cars from reaching their full speed potential.
How can I safely build derby cars with young builders?
Safety requires proper adult supervision, correct tool handling, and maintaining a safe workspace. Essential safety equipment must be used during all construction phases. Establish clear emergency procedures and keep contact information readily available. Teach proper tool usage techniques and ensure young builders understand safety protocols before beginning any construction work.
What are some creative painting and decoration ideas for derby cars?
Creative options include sports team themes, animal designs, and holiday motifs. Use automotive-grade acrylic paints and wet sanding for smooth finishes. Apply vinyl decals and graphics for professional appearance. Ensure racing numbers are visible while maintaining aerodynamic performance. Theme-based designs allow builders to express personality while boosting team morale during competition.


